
I often find furniture or craft projects that need just a little something extra to dress them up and plaster ornaments are the perfect solution.

I have never seen plaster molded in polymer clay but, it is the way I have always done it, it's inexpensive, and it works.
I use any polymer clay that needs to be baked
in order to harden

Find anything you would like to make a mold of. I used a drawer knob here.

Always use dusting powder and coat your object first so it will not stick to the clay

I kneaded my clay until it was soft and pressed the flower into the clay

You now have a mold

I mixed up a small amount of plaster.
I found this plaster on clearance a long time ago, but you can use any plaster from the craft store.

Pour the plaster in to the mold, tap it to get out any air bubbles, and let it dry. This particular plaster hardens in 1-2 hours.

After it hardens pull the clay away from the plaster and take your molded flower out.

The green on the plaster is the color picked up from the clay. I used green clay for this tutorial to make it easier for you to see. It would be best to use white clay.
You will see that you have to clean the edges around the molded flower.

I used a Dremel

But, chipping it away with your fingernails and then using a finger nail file will also work.

But, chipping it away with your fingernails and then using a finger nail file will also work.

I used E-6000 glue and attached 3 roses to this letter holder
Taking it from this

To this
Here is a few tips to make this project successful
Be sure not to bake the clay, the reason this clay works is because it is flexible, if you bake the clay you will not be able to remove the molded plaster.
This mold can be reused many times, the clay will not harden unless baked. I keep it in a ziplock bag. You could also reuse it for another project.
You can mold any object
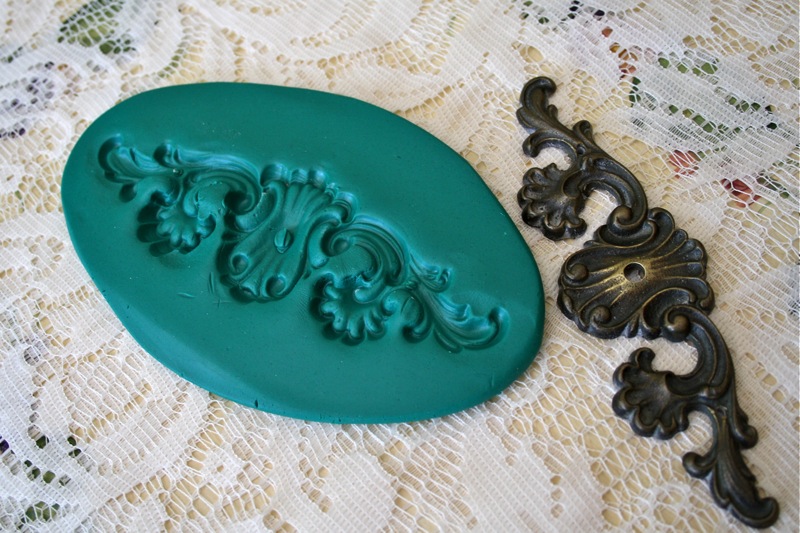
This drawer plate when molded will be fragile because it is thin and has more of a chance of cracking, but it can be done. You may want to push it farther into the clay to make the plaster a little thicker when you mold it.

I dry brushed this shelf

And added the plaster mold to the top

I wish I had filled in the hole in the center with clay, oh well.

There is nothing wrong with using ornamental wood, but they get a little pricy and have limited designs

Making your own molds gives you limitless designs.....

There is a product called "Amazing Mold Putty" that you can purchase at any craft store for $19.99 that makes permanent flexible molds.
But, If you're like me and just occasionally need a plaster ornament for a project, the polymer clay works great.
I have used plaster ornaments for:
Suitcases (By the handle)
Tin, wooden, and cardboard boxes
Picture frames
Any kind of furniture
I can see your creative minds are spinning with ideas!
Update: I added a post HERE on making plaster appliques with gum paste molds generally used for cake decorating....Easy
Update: I added a post HERE on making plaster appliques with gum paste molds generally used for cake decorating....Easy
Happy Creating!
Carol
I am joining these wonderful parties
Designer Garden
Miss mustard Seed Furniture Feature Friday
Wow us Wednesday @ Savvy Southern Style
BTNOP Metamorphous Monday

I am joining these wonderful parties
Designer Garden
Miss mustard Seed Furniture Feature Friday
Wow us Wednesday @ Savvy Southern Style
BTNOP Metamorphous Monday
88 comments:
If I had an award for best tute I have ever seen, yours would definitely get that medal! Simple, great images, alternatives, well explained, etc. etc. etc.! Really, an impressive job...the kind of tute that makes me wonder "why I didn't think of that"...but you did, and I really am appreciative! Thanks so much...♥
you are my hero,, Ms.Super Crafty Woman.You come up with THE best ideas and make them sound so flippin easy,, even a craft challenged person like me could do this,, at least I could tell myself I can.thanks for this,
Ohhhh Carol....I am totally loving this tutorial. What a great idea! I buy appliques on occasion and they can be pricey. Thanks!
Carol, you're a genius! I love this idea!!! Thank you so much for the inspiration! We just picked up a bedroom set for my daughter at an estate sale...I'm going to be repainting/refinishing it, but each piece has these awful (in my opinion) shell appliques on it...yuck. This would be the perfect way for me to change out the medallions without spending tons of money!!! Yay!!!
How genius is this? I will certainly have to give this a try!
Awesome Carol! Another little thing for me to try... you are not good for me ha ha! My little brain is about to explode with ideas and it's your fault ha ha!
Have a great week xoxox
Hi Carol,
I thought for a moment I was watching HGTV and this clever chic was showing us how to make gorgeous molds....you could be on HGTV, you know.
Great tutorial, but I'm probably too lazy to do this one. Love how the sweet little piece turned out. You are a genius!!!
hugs
Sissie
Ah this was a fabulous tutorial, and I am so glad I spent some time here. Thanks so much. I will try this for sure.
Carol you are one very talented and clever and creative woman. Love all that you do. Happy week ahead...
Carol,
Such a great tutorial! You are so talented and creative. I love how your projects turned out!
Nancy
from Nancy's Tidbits
For some reason I'm not able to comment thru my account!!
Nice breakdown Carol. This is one of the methods I've used. Yes, wooden and even some of the plaster appliques can be very pricey. This way you can customize.
You are a GENIUS Carol!! Not only are you a genius but you are kind enough to share your tips, tricks, tutorials, and creations with all of us! I love this and can think of so many ways to use it! Thank you, t. xoxoxo
Great tutorial, Carol!! I love reading your "how to" posts. I'm also loving the letter holder, the transformation turned out so cute n shabby!!
Hope your weekend was fabulous!
Sherri
Carol--
You must read minds! I have been wondering HOW to do this for some time! I LOVE, LOVE, LOVE your easy to follow tutorials!!! I knew I needed a Dremel too! This is fantastic!!! :)
I'll keep you posted when I create some.
HUGS!
-pamela
Carol, this is the neatest tutorial. I have the neatest iron bird's nest picture hanger that would work so well :D
Carol ~ would you STOP doing so much! You are starting to make me feel very lazy! Awesome tutorial woman! (*_*) ~Stacy~ xo
these all turned out SO gorgeous! so many great project ideas to be had from this!!
You are amazing! I love this how-to, thanks so much for sharing, the results are fabulous! Scarlett x
Yep. I'm spinning as usual when I come here. What a great tip, and what a frugal way to dress up just about anything!
This is another super clever idea! Your tutorials are so easy to follow and I love all the details and pictures. Thanks for sharing such great ideas with us!
You are a genius, my dear!
Great tutorial!!! I would have NEVER thought to make an ornamental applique myself!!! You are super smart!!!
Carol, thank you so much for sharing this!! I was wondering a long time how to make such applications. Thanx to you I'm finally able to finish some of my projects :)
And I really like what you've made of these two "furnitures"!
Have a great week
OH MY!! That is AMAZING....LOVE it..I can't wait to give it a try....I will also have to show this to my son who loves to work with polymer clay...when he finds out he can make molds out of it he is going to go BONKERS!!!
ALL of yours came out so LOVELY..even the one with the hole in it.. : ) you can always put a Rhinestone or Pearl in the center...
Have a great day and thank you for sharing this with us..
Wow! Terrific tutorial! I've never thought of making my own plaster molds, but now have all sorts of ideas brewing. Thanks for sharing.
Carol that is awesome! My son loves working with clay. I wonder if I can get him to try this?
This is a great tutorial! Thanks for the tip.
This is fantastic! I have been wanting to make an inspiration board from a $.95 thrift bulletin board and this will be perfect for making some embellishments!
Wish I could have met you at Shelley's! I was supposed to be there, but couldn't because we were expecting our oldest to give birth at that time here in our home. Hopefully I can meet you at a future blogger's gathering! :o)
Thanks so much for sharing this!
Have a fab week!
Becky
Hi Carol,
I've had trouble posting a comment on a few other blogs, too. No matter; I just post annonymous! I'm going to see if I have to on your blog this time. I'm crossing my fingers!
(didn't work, oh well!)
Nancy
http://nancywiebel.blogspot.com
You are amazingly clever!
that is a clever idea! I always have mold making material handy and never thought of that.
I have had to replace pieces on ornate frames and mirrors and there is a brush on mold you can use to copy pieces right on the mirror or want ever, you get the parts you want then can cast them and stick them right on without having to take the piece off the orignial ... it's made by a company called Smooth-on but I think you can find it at Michaels and Hobby Lobby too. (())
You are GOOD! Those look great and you make it look easy! I don't know what can of mess I would get into...but I would love to try it! Enjoy your week! ♥
Carol, WHY aren't you teaching classes and making a business out of your gifts and talents!
THANK YOU for your comment and support on the little pink camper and the BPBP! You are the second person today to ask me to come to Florida! How exciting is that!!!!!!
ROAD TRIP!
Have a pretty day!
Kristin
You really are the clever one! Thanks for the tutorial!
Very smart. It turned out well.
Carol,
I can think of a hundred ways to use this clever and creative idea! Wonderful! This could add just that little touch and embellishment to in-need-of-love objects. The ones you transformed turned out beautifully!
Thanks for all the inspiration.
Yvonne
Great ideas, thanks for sharing!
Love your blog that is such a cool idea, love it! also love that dress in your main pic, so cute!
Thanks so much for this post. This will be so helpful to me for future projects.
OH!!! Bookmarking this! I've purchased those wooden shapes for Hobby Lobby and they are not cheap -- thanks for this great tutorial!
I think I love you!! Seriously....I was just looking at some wooden appliques at the home supply store last night and couldn't justify the cost. But THIS is something I can do. YAY!!
This was a fantastic tutorial!! :)
Oh my goodness.... this is a fabulous idea and tutorial. Thank you so much. I'm going to be spending the rest of the afternoon scouting for projects. :-)
Huggies,
Spencer
PS... I have those rose knobs too.... that's a start. :-)
Now THAT is something really original! I love it. I'm adding it to my "to try" list! Thank you!
This is FANTASTIC!!! You explained everything so well and, YES, my mind was spinning with ideas by the time I was done reading it! Thank you so much for posting this! You are one talented lady!
WOW!! That's FANTASTIC!!! I have lots of polymer clay sitting around and never thought of using it UNCOOKED for molds...so SMART!!! I can't wait to try it! Now I'm glad I didn't buy those wooden decorative pieces that were tempting me so badly last week! :)
This is the most awesome tutorial I've seen! I can't wait to go get me some plaster and go to town. You've made a new follower out of me =) Come share this at my party this weekend too if you'd like! http://designergarden.blogspot.com/p/where-i-link-up.html
Ok, I think it is official, I am in love with you! LOL I have been thinking of making some embellisments and thought I would have to build them up from putty. This is wonderful. Thank you again for a perfect tutoral!
I have wanted to do this project for at least 6 years and kept putting it off because I didn't know what clay to use, what to put between the clay and the plaster, what plaster to use, etc. I had loads of ideas but not the patience to try them all out and to make my final project so it kept spinning in my head. You have filled in my necessary details. Me and my future wall art thank you.
I like this sooooo much better than the wood pieces you buy. They look cheap to me. When I did my kitchen I ordered some for the cabinets like this but now I can make my own. Fabulous tute Carol.
This is SO awesome, and your instructions are clear as a bell! Great job!
Carol...do you think the plaster will set if I use regular childrens clay instead of sculpey? I really like this idea.
Sylvia
this is absolutely brilliant! thanks so much! amy
I absolutely Love your tutorials!!! Thank you so much , your ideas are so helpful :)
Carol, These are the things I WISH HGTV would have in their programs? Things we can really use! They need to think about "The Polka Dot Closet SHOW!" I think it would be a huge success!
THANK YOU for all your great ideas!
Becky
You should try the silicone mold stuff the use for making small fimo things.(eBAY) A permanent yet flexible mold.
VEE
Great tutorial and I will be using this technique soon!
Thank you... Thank you... Thank you... Love this!!!
Thank you...Thank you...Thank you... Love this!
Me again ;) When you say "dusting powder" is that something from the craft store or is that just powder for my body? XoXo
I used your technique to make appliques that I recently applied to a laminate TV/entertainment center armoire that I turned into a beachy china cabinet. I made starfish and seashells to embellish the doors and absolutely love how it looks. I'm so happy I found the tutorial. Here's a link to my final pic! Thanks, JUDY @ Distressed, But Not Forsaken
http://www.facebook.com/photo.php?fbid=210085762380120&set=a.202255376496492.55367.166766823378681&type=1&theater
This is soooo awesome!!! Love it!! Thank you for sharing!!!
LOVE THIS, Thank you!
Just stumbled on your site from Graphics Fairy. Love it and will be back!
K
You are just a font of knowledge everytime I think about something I would love to make you help out. thank you very much and this tutorial will be used over and over again. Just what I needed and at the right time, how did you know.?????
Hi Carol,
I love this! Your so right my head is spinning with delight. lol
I have to try this.
Dee
Hi, I just found your blog from Debbie over at Debbiedoos! I so love this clay mold idea. And, I have so many places I could use it!
And...I just became your newest follower! Would love if you reciprocated and followed back.
By the way, your home is gorgeous!!Thanks and have a great weekend.
Awesome! Thanks for sharing this! ♥
Thanks for this post! I am your newest follower! Come check out my blog if you get a chance!
Thanks so much for this! Amazing :-)
Thanks so much for this! Amazing :-)
Thanks so much for this! Amazing :-)
This fantastic. Thank u so much. Wish I had known a lot sooner but better late than never!!!
If you only knew how many times this week I have said "This woman is a genius." Having just found your blog, I thought it my duty to go back and read as many of your blog posts as I could. I feel that we would be kindred spirits, or maybe partners in crime if we lived near each other. I love everything I have read so far and don't have enough time in a weekend to do it all, but I'm sure gonna give it a try. Thank you for so freely sharing your amazing creativity. You truly are gifted.
Thank you for this tutorial! I need to replace some plaster trim on an antique frame and this is the method I shall use. I knew it could be done and wasn't quite sure how to proceed. You are so talented and I enjoy your blog so much!
May your holidays be blessed! Linda
What a fabulous idea! Can't wait to try it. Thanks for the great inspiration!
Love your blog
~ Karen :)
wow, this is awesome. What a fabulous idea, most practical tutorial I have ever seen!
Just loving this project and I have the clay to make some (and those rose knobs too!) and can't wait to add some furniture bling.
Thank you for sharing,
Hugs Lynnie
Hi carol love this idea so much, can I use this technique on bathroom tiles or would I have to use something different?
Thank you! Gracias! I had been thinking about this for some time now. I thank you so much por posting this. My idea though, was making them out of polymer clay using silicone moulds, since I thought plaster was too fragile. ¿What do you think about making the embellishments out of polymer clay?? Saludos from México!!
Marisol HB
can I please ask what the dusting powder is called
can I please ask what the dusting powder is called
Tinyhawk Forde, The dusting powder is any powder, baby powder etc
The Polka Dot Closet
But beside the perfect winters, the vintage furniture shopping is pretty great and affordable. HC Plastic Chairs
"There is nothing wrong with using ornamental wood, but they get a little pricy and have limited designs"
If you ask me, your way would be more pricy, you still have to buy the item to actually make the mould, plus all the other items. Give me a piece of wood and a dremel any day
Hi,
Here's my suggestion to strengthen pieces with fragile parts for your mold-making process. I add white glue to my plaster mix. Simple and effective. I also add glue to any project that I figure needs added strengthening such as paper mache, top coats.
Nice projects :)
The active ingredient inside this medication is Sildenafil citrate 200mg. The medication permits a huge amount of blood to flow towards the male part.
Buy Sildigra Gold
Looking to buy Sildigra Soft, a reliable erectile dysfunction tablet? Buy sildenafil 100mg tablets at a low price for enhanced intimacy.
Post a Comment