October 31, 2011

Shabby Little Mitten Ornaments From Vintage Linen Scraps


Every year I make these mitten Christmas ornaments.  They are a great way for me to use my torn and stained vintage linen scraps I have been squirreling away all year! 


I am always saving vintage hankies, and embroidered linen that is stained or has holes, I just can't bare to throw them out when some portion is useful


This is the perfect project to use some of those scraps


I drew a free hand pattern of a mitten 5 1/2" X 4 1/2", cut two, sewed them together and embellished


These were from an old tablecloths and an antique quilt


An old hand towel, table cloth, and quilt


Hanky, hand towel, and tablecloth


I adorned these with vintage lace, buttons, flowers, and jewelry

They are hung on a coffee mug holder in my booth at Orange Tree Antiques


 I also box them up pretty for hostess gifts over the holidays.


I think we could call these "Second Hand Mittens"!


Happy Creating!


Carol


Linking with
Christmas Crafts@ Project Queen
WOW@Savvy Southern Style
Sugar Bee Crafts
 Coastal Charm NIfty Thrifty Tuesday 
Chef in TrainingTuesday Talent Show

October 27, 2011

Cutting Edge Stencil $50 Giveaway


The winner of this giveaway is LindaQ@Royal Touch Congratulations! please contact me


I love these stencils!  
Cutting Edge Stencil has generously offered to give one of my followers one stencil of any value up to $50.00! 


That will get you almost any stencil they sell


I have been thinking about redoing my bedroom and thought these stencils would be the perfect alternative to expensive wallpaper


They offer big massive stencils making short work of an entire 
room or just some wall art


Or you could stencil furniture...We love that!


 Stenciling is an easy process with their "How to" video


Here's 2 ways to win


1) Be a treasured follower of this blog and leave a comment
For a second chance
 2) "Like" Cutting Edge Stencil on Facebook, then leave me a comment that you did


The first time someone came to my Facebook page and said "I like you, I hope you like me back"  I was so sad, I thought "The poor thing is trying to get someone to like her!"  So, I went back and commented "I like you too" Oh...Groan!


GOOD LUCK!
This drawing is closed the winner is LindaQ@Royal Touch Congratulations!  Please contact me 


Thank You Cutting Edge Stencil!


Happy Creating!


Carol


Linking with Someday Crafts


October 24, 2011

Decorating Polymer Clay Cabinet Knobs

On my last post I showed you how I made the polymer clay knobs for my sweet little linen cupboard transformation 


I wanted to throw out some ideas on how to decorate polymer clay knobs


 I know with all of the creativity out there the possibilities are endless


Pull out all of your rubber stamps, buttons, water slide decals, and bling


The buttons and rhinestones I put on my knobs before baking


I am such a loser of a decorative artist, but wanted to show you the possibility of painting your knobs...Next life, I want to be able to paint and sing!


On these I used my rubber stamps after baking the knobs


Depending on how much wear the knobs get you could coat them with clear acrylic spray, I really like this triple thick acrylic spray


It gives the knobs below a nice shiny look

I used rose water slide decals on my knobs for the linen cabinet


There you have it, I can't wait to see the ideas you come up with!


Now I have a bunch of free knobs for future projects! 

Happy Creating!

Carol

October 20, 2011

How To Make Polymer Clay Cabinet Knobs

When I transformed my sweet linen cabinet I needed new knobs, so I thought I would try my hand at making my own...It worked!


I love the way the knobs look on my cabinet


This is how I made them, now don't be intimidated by all the steps, it really is easy, I just like to make sure you have all of the details

I used polymer clay that you bake to harden.  This was a huge box but, you can get a small block.


I rolled the clay into balls, you may be able to eyeball the size to get them all the same.  I used my old Weight Watchers scale to measure out 1oz hunks of clay


Then rolled them into balls, just like rolling meatballs!


Now, you don't have to, but I decided I wanted my knobs to set off the cabinet a little, so I rolled smaller balls and put them on the big balls then smashed them down a little


I bought screws and nuts from the hardware store.  #8-32 screws are the size you buy with knobs, be sure to buy #8-32 nuts to fit the screws.  I got 1-1/4 inch length which will fit on most cabinets.  You can buy them separate or together in a box.


Now, make a hole straight into the clay.  I used a food skewer, you could use a paint brush handle, just make sure it is larger than the diameter of the screw.  I made the hole deep so the screw could go deeper if the cabinet wood was thin


Now, take your nut and put it over the hole


I used a crochet hook, but you could use a paint brush handle to clear any clay that may have blocked the opening when you pushed the screw in


Then using the paint brush handle roll some of the clay back over the screw to make sure it stays in

Even doing that I had one knob where the screw came out, I just used a little E-6000 glue on the outside edge of the nut, let it dry and then it stayed in


Now, bake your clay according to the package directions, I baked mine at 270 degrees for 25 minutes, but since all ovens are different do a test run on one.

When I did the tutorial on making clay roses a reader sent me a picture of a pan of burnt roses... I'm just saying, do a test on just one so you don't burn a whole pan of knobs 

Let it cool and your done!!!!


Honestly, if you can roll a meatball you can make a knob!

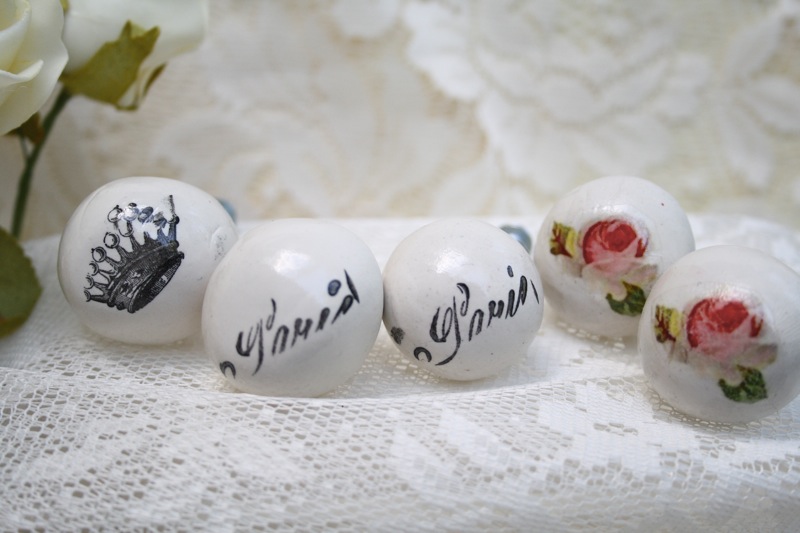
The best part is decorating your knob and making it just your style

This post will give you some knob decorating ideas!


Happy Creating!

October 17, 2011

A Sweet Little Shabby Cabinet


This Transformation is so sweet it will make your teeth hurt!


I got this cabinet last month when my Mom gave up her snowbird status and moved to Orlando full time.  I have had my eye on it for years and there was no room for it in her new place...Oh, to bad..Yea!


I painted it heirloom white and added free porcelain flowers to the top


Then added a water slide decal.  I got the graphic frame from Graphics Fairy and wrote the word "Linen.  Let me just tell you, putting a decal this large on a window...Nightmare, it took 3 attempts and a lot of bad words, kind of like "Poop"!


I used a thrift store wall paper on the inside, I think it's Laura Ashley


Are you falling in love yet?  I'm storing my vintage family linen


It's going in my guest room, but the room is to dark to photograph in


I love it!  My apologies to all my friends out there who aren't into the whole shabby white thing...I know your teeth are hurting from the sweetness!

Wait a minute...Where did I get those knobs?


I made them and you can too!  


Happy Creating!
Carol


Linking with
BNOP Metamorphosis Monday
Miss Mustard Seed Furniture feature Friday
Common Ground vintage Inspiration Friday
Transformation Thursday @ Shabby Creek Cottage
Wow Us Wednesday Savvy Southern Style

October 13, 2011

Water Slide Decal French Step Stools

I am so excited to show you these step stools I applied French water slide decals to


I had questions on my last post about why I use water slide decals instead of say, decoupaging on a graphic.  This stool is a perfect example, decals allow you to see through to the surface of whatever you put it on, it could be chippy paint, wood grain, or rust and it gives the graphics a painted on effect! 

This stool is just as I found it, I gave it a good scrub and water slide graphics


See these other posts on Water Slide Decals
Using water slide decals
Water slide decal table
Water Slide decal chair


This step ladder was a thrift store find


I dry brushed with blue paint

And a graphics from Graphics Fairies  

Decoupaging a paper graphic would not allow you to see the surface behind it. 

I hate the pink color I sprayed this stool...Can we say Pepto Bismol YUK!

Even with gel stain it is still to pink...Oh Well

Check out the wood grain showing through the decal, it was a little difficult to do a large decal like this, I did not get is perfectly centered, bummer! 

 I finished all of these stools with wipe-on poly acrylic

For all of my bloggy friends that have antiques booths, step stools and stools with French graphic decals have sold really well for me,  I price them between $26-$36


Thank you sooooo much for your feed back on my last post about ordering blank water slide decals to sell....I ordered them and I'll let you know when they are available to purchase.

I really appreciate your questions and comments, if you have a question, I am sure other people do to...so ask away!

Happy Creating!