April 29, 2014

Raised Plaster Furniture Stencil

I'm Busy doing a few more projects for my booth at the

I did a raised stencil design on this side table


It started as a ho hum side table


I used a stencil and applied plaster since I didn't have any vinyl spackle on hand.  I will go back to using vinyl spackle though because it adheres better and is smoother.  HERE is a tutorial on using vinyl spackle with a stencil


Here's Miss Billie...showing off the fact that her eyes are the same color as the cabinet!


I also upcycled this moth bitten needle point chair


Two more projects to check off the list....I have so much to show you for the Polka Dot Flea...I'm just busting, stay tuned!

Oh, I wanted to mention that there seems to be a problem with blogger.  Not all comments are coming through to my email, I know I am not the only one having this problem.  I always return comments (I have trouble with some that are using google+ since I'm not)  Know I am not ditching you....Hope google works this out soon!  I'm now checking comments on my blog dashboard

You can check out the Polka Dot Flea website HERE
Follow the Polka Dot Flea on FB HERE


Happy Creating!
Carol

April 24, 2014

Ticket Booth For The Polka Dot Flea

The biggest project for the Polka Dot Flea so far has been building the ticket booth...


Nope.  A lunch room table was just not going to work for me.  I had to build a ticket booth...with the help of my son.  This was not a one woman job!

We used all salvaged materials (see: a lot of curb shopping).  The only expense was $12 for hinges we used for folding legs.


The ticket booth is completely portable--it all comes apart to be transported and then reassembled at the Polka Dot Flea!


I dry-brushed fence boards and then made a wooden sign for the front of the ticket booth.


The top is a door covered (modge podged) with old magazines.


...and old shutters make up the sides


The canopy was made with coffee bean sacks 


I snagged the neighbor girl and the "grand-dog" for some pictures.


"Welcome to the Polka Dog Flea!"


Oh my gosh!  So many projects...so little time!

I know I should be humble.  ...but I have to say...I am really pleased with how the ticket booth turned out!


You can check out the Polka Dot Flea website HERE
Follow the Polka Dot Flea on FB HERE

Happy Creating!
Carol

April 21, 2014

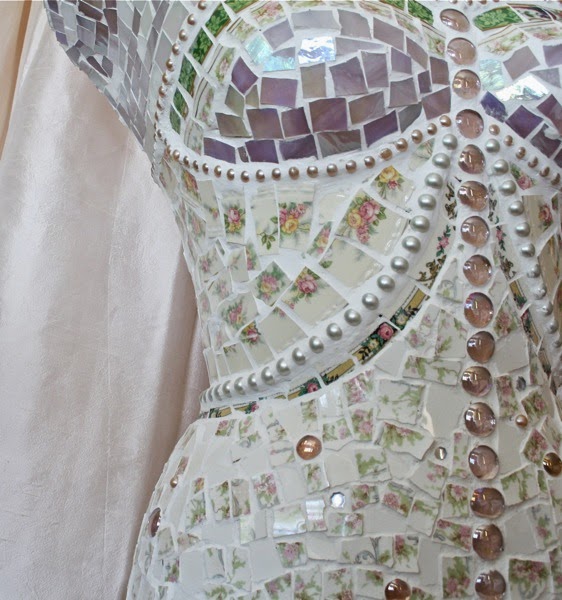
Making A Broken China Mosaic Dress Form

This is one of the biggest DIY project I have ever done....Oh my, it took me a week to complete


I have wanted to do this for a couple years and I finally did it!  I thought how cool would it look to completely cover a dress form with broken china?

So when I found this battered dress form at an antique shop and my friend gave me an antique lamp base.....It was time to try it


I removed the t shirt fabric from the form and got started

With tile adhesive I first attached the pearl necklaces around the bust.  I had to use tape to keep them in place until the adhesive dried


Then I picked out the china plates and stained glass I wanted to use and got started

I used a drapery finial on top


And the antique lamp base on the bottom


Can you find the heart on her backside?


I'm bring Her to sell at the Polka Dot Flea 


Now, before I give you the price I have to tell you what I have invested.......
It took the better part of 6 days to complete this project.  

I used over 25 plates, since the rose pattern is only along the rim of each plate.  I used 3 different sheets of stained glass and 2 pearl necklaces.

Then each piece was individually cut (Not hit with a hammer). The pattern was layed out and the china applied piece by piece.  Each piece was leveled so you get that smooth feeling when you run your hand over it. The form was then grouted (Big mess) sponged off and then each individual tile piece got polished.

So the price.....$500...Yes, that's right, and If it doesn't sell...Well, it looks mighty fine in my dining room!


If you are interested in trying broken china mosaics you can read a previous post I did on the basics of getting started HERE.  Anyone can do it with a some practice (On smaller projects).  I'm surprised that I enjoy doing such a tedious project because I'm pretty high energy and seldom sit still, but I find mosaics are a little like doing Yoga, I do it in complete silence and find it really relaxing......Go figure!

The planning for the Polka Dot Flea is going great!  I will give you an update on my next post.

You can check out the Polka Dot Flea website HERE
Follow the Polka Dot Flea on FB HERE


Happy Creating
Carol  

April 15, 2014

Getting Featured In Barr Displays Catalog

Getting featured in a magazine is one thing, but a catalog....Pretty amazing.....Yep, there's my projects right on page 93 of Barr Display 2014 catalog!


I have a long working relationship with Barr Display you can read about it HERE


For a couple years they have sold dress forms that I alter and age for them...Tutorial HERE


I have also had fun aging their baskets...Tutorial HERE


And altering neck forms....Tutorial HERE


They sell a ton of fun things to use in your homes and boutiques. And great items to display your wears in your antiques booth or at craft shows


I am thrilled that not only is Barr Display a sponsor for the Polka Dot Flea they will be a vendor...So you can pick up their products right at the show and avoid shipping.......But, If you can't make it to the Polka Dot Flea you can order your free catalog right HERE!


Thank you Barr Display...I am so honored!

Happy Creating!
Carol

April 8, 2014

Painting 3 Vintage Tool boxes

Anytime I see vintage tool boxes I buy them...Oh the possibilities


Goodness, the clock is ticking and I have to get some goods ready for the Polka Dot Flea.   The whole reason I'm doing the Flea is to be a vendor at an indoor venue!


After a good cleaning with a wire brush and a wipe down, I painted the two bigger tool boxes with a dry brush technique...Tutorial HERE


The graphics are from Graphics Fairy and were transferred to the boxes with the blender pen method

The graphics on this tool box are the bottom lettering from this graphic


I couldn't help myself...I needed one girlie tool box with polka dots lol

The polka dots were made with a round sponge...No fail method...You can see how HERE


Great for storage 


And with spring in the air, they make great planters


So there you have it...Three tool boxes ready for the Polka Dot Flea


I have so many projects in the works......You guys are the best!!!  Thank you for letting me share these projects and this whole Polka Dot Flea journey with you!

Happy Creating
Carol

You can check out the Polka Dot Flea website HERE
Follow the Polka Dot Flea on FB HERE

April 3, 2014

Painting A Vintage Bike


 I thought painting this vintage bike would be a ton of work, but I was pleasantly surprised at how easy it was!


I bought this bike to use at the Polka Dot Flea...of course I had plans to spruce it up.


 I think it will be perfect leaning up against the front railing greeting shoppers as they arrive. 


Of course I had to paint it, and what would one of my projects be if I didn't add flowers?! 


Since I wanted the bike to have a little contrast I covered the seat, handle bars and pedals so they would remain black.   

 Then spray painted it using two cans of Krylons "Catalina Mist"...Oh, I love that color!  I sprayed the top then turned it upside down and spun the tires as I sprayed.

I used zip ties to attach a basket and added faux, and real flowers (from my garden).


I made the sign by using the EZ tracer; you can see the method HERE.


It looks ok from far away, but look close.....


Goodness a second grader has better decorative painting skills than I do...good thing I'm crafting in the age of "shabby is cool"...lol!

OK, I know the weather is still crummy for so many of you, but I couldn't resist showing you the flowers that are blooming here in Orlando...my bougainvillea is going crazy!


So there you have it...Painting a Vintage Bike 101...

This would look so cute in a vintage shop or garden...it really is an easy project!

I would love for you to visit the Polka Dot Flea website HERE
Or 
Follow the Polka Dot Flea on FB HERE


OMG the Polka Dot Flea is just over 2 months away!

Happy Creating
Carol