
Making Clay Roses


Make it-Follow the tutorial
Win it- Leave a comment and follow my blog
Usually with a new craft there is a considerable investment in supplies. The great thing about making clay roses is that your investment is a toothpick and $1.29 block of clay.


.

Now, there are many kinds of clay, these little packs are $1.29 and a great way to start if you aren't sure if this is your craft. Be sure to get clay that you bake to harden.

I prefer the Sculpey, but there is no wrong choice. Sculpy comes in a big block for around $7.00.
A note about color. I get white and then paint it, I just don't dig any of the colors it comes in. Here is the pink and green pre-colored clay.

Are you ready? Here we go!
There are many ways to make clay roses, this is how I make them.
Take your clay and work it in your hands to get it softened up. Now roll it into 5-6 little balls.

Take your little balls and flatten them into circles or closer to ovals.

You start by rolling the center bud, I make this one a little fatter then the rest.

Then keep adding your petals, alternate them so they don't all start and stop at the same place.


As your layering the petals, make the outside edge of the petal thinner so the final layer is really thin just as it would be on a real rose when it is ready to drop off.


Note how the petals are curled.

You can add as many petals as you like, 5-7 for a good size rose and 3-4 for a bud. In the following picture you will see the rose in the front is more like a cabbage rose, I curled the petals a little more and pinched the petals here and there. The roses in the back are more "Perfect" (I use that term loosely). I like both styles.

When you have added all of your petals you can pinch off the bottom or cut it so it's flat.

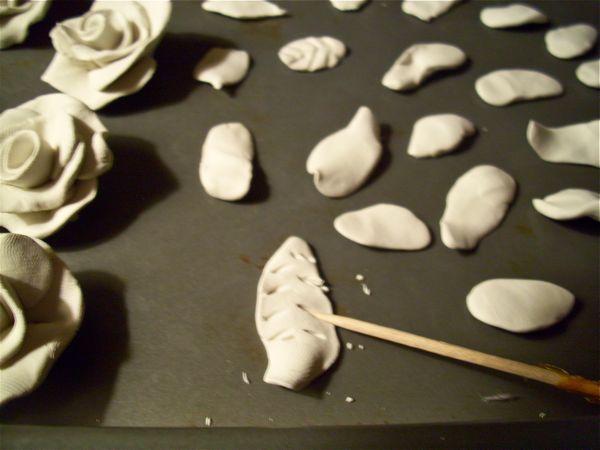
Next make the leaf shape and then use a toothpick to put the lines in. Be sure to curve some of the leaves before you bake them so that they are not all flat.
It's time to bake. Each brand has a little different directions for baking. I have found 270 degrees for 25-30 minutes works for me. If you do not bake them long enough they will have a rubbery texture instead of being rock solid.

Let them cool, then it is time to paint.

You could brush on acrylic craft paint, but I like to use spray paint as it is easier to get in all of the crevasses.

Spray the backs and then the front. I use a brush to paint the leaves because I have not been able to find a spray paint in green that I like.

Ta Da!

A Platter of Roses
Platter available at my on line store The Polka Dot Closet
Now what are you going to do with your roses?
Add them to a picture frame?

How about a knob?

Here is a chance for my Bloggy Friends to
Win it!

5 roses, one with a vintage jewel in the center (Just leave out the center bud and then insert the jewel after you paint) 5 leaves, and a 5 ft strip of imagine fabric.
Imagine what you could do with these roses.
To Enter the Drawing on 5/29/10
The winner is Bird from BirdCraft
Become a new follower and leave a comment.
or
If you already follow, leave a comment and say "I already am"
Limited to the continental US and Canada
That's it kids.....Get Creating!!
Carol
45 comments:
Thanks for sharing the clay roses. Look easy enough...just need A LOT more time in my day :)
I'm a follower too :) and Yes, I would love to win some of your roses.
My BFF lives in Florida and her name is Carol...
just a little FIY...
I went to a FEW garage sales today..and found goodies for my booth/room.
Deb :)
I already am a follower! I love the make it/buy it set up, perfect for those of us clay-challenged!
~Kelli @ Smidgens
Beautiful roses. It looks easy enough to do I may try it! Please enter me and I am a follower already!
-Danielle
I love these. Thanks for the tutorial. What color is the pink paint? I am already a follower. I am heading over to your online shop now :)
Check out my blog for my giveaway too!
Peace,
Roselle
I am SO glad you did this! I think that they are just gorgeous!I can't wait to get started...of course, I'd really love to win YOURS:)
and as for being a follower, "I already am!"
Those are just the sweetest roses...I love them!
I'm already a follower.
Carol, I already am a follower. Does that mean I won this giveaway????? LOL
Great tutorial. Just one quick question from someone who's never worked with clay.....can I press the leaves to the flower before baking and then cover the leaves if I want to spray paint the petals? Thanks.
Your rose are lovely. I have never done much work with clay but your tutorial shows me that maybe I could try it. I enjoy visiting your blog and I am a follower.
My goodness you make these look so easy to make!! I love the tutorial!!
oh yes!! enter me! I'm a follower already. Love the roses, might try it out too!
I just discovered your blog and I'm IN-LOVE! Lol. No kidding. I love the idea of these clay roses and you have inspired me. Send some readers my way, as my blog is new and needs some loving! ;)
http://www.apinksouthernoak.blogspot.com
p.S. and there is only room for my head around here!
Carol you followed the rules and then some:) You are in my friend. And I already told my husband you think he is hot...now if I tell him again you said it....he may get a big head lol!!~
HELLO,
LOVE YOUR CLAY ROSES, LOOKS EASY, I WILL HAVE TO GIVE IT A TRY....AND IM ALREADY A FOLLOWER, PLEASE COUNT ME IN FOR YOUR LOVELY GIVEAWAY :)
Oh my sweetness i am going to be making roses all weekend, it looks really easy i hope i can do it. thank you for stopping by and a big THANK YOU for the tutorial,
hugs,
Olivia
Carol, thanks for the tutorial for your pretty roses. My daughter tried to teach me how to make them, but I'm sculpturely challenged! I'd much rather win yours! Oh, and I'm already a follower!
Big TX Hugs,
Stephanie
Angelic Accents
Oh how clever and pretty!
Thank you for your kind comments. May you always be charmingly blessed.
I hope you'll stop by my blog. I am hosting a giveaway for a darling French tote.
Oh, thank you for the tutorial! I am so going to have to play around with some clay very soon! LOL
Wonderful giveaway! throw my name in the hat! I am a follower!
I already am! I need those roses really bad! ~~ :)
Lovely roses. Thank you for the tutorial - I have TONS of clay at home!
Oh, and I follow (you have the loveliest blog).
Smiles~
Marilyn
Love your roses! I am going to have to try and make some of these. Thanks for commenting on my blog about my lace collection. I am so glad that I am finally getting it washed and ready to use. Tomorrow, I have to finish the last of it and then start working on my projects. Have a wonderful weekend.
hugs, Sue K
Thank you sooooo much for sharing! Yours are beautiful! I think I'll give it a try but I'm not sure they will look as nice as yours, ha! BTW, where do you buy the clay? I am already a follower!
Hugs,
Jacalyn
OK I am on my way to Hobby Lobby to get some clay, you have inspired me. So GREAT!!!! Thank you for the instructions and thanks for stopping by my place.
Ginger
Hi Carol, am so glad we have artists like you making these roses! They are beautiful and look so real. You do a great job. Don't know if I'm too late for entering but would love to win those beauties.
Just a note...I have a school teacher daughter who lives in Orlando, and a granddaughter who attends high school there.
Have a great week end.
Smiles and Blessings,
Nancy
I LOVE the rose!!! It reminds me of when my grandma and I used to make icing roses for cakes. Good memories!!! would love to win as there are so many great things to do with cxlay roses!
I already am!! GREAT tutorial!
Sandy xox
Thank you for the lovely tutorial!
Beautiful! HPS!
beautiful roses, great giveaway.
I'm already a follower. I love your blog.
I love the roses, I always have and I am so grateful that you have shared this!! I am commenting and following not because I want to win, but I really, really do.....its because I love your post and blog! Sincerely,
Machelle
Carol, I got my clay and made some and put them on my blog and you were the star of my post. Check it out.
Thanks
Ginger
I got the pink sculpey clay at Hobby Lobby, they had some really pretty colors.
Ginger
What a fabulous idea and great tutorial!! Thanks for sharing! Will definitely be giving this a go! Sooo many great creative ideas here.. will definitely follow now I have found your gorgeous blog!
Lou xx
D'ya know, it's exactly the same process for cake fondant?! :)
Thank you for showing us how!! Your roses are stunning!!
How many flower heads can you make out of tha small packet?
Love,
Bird
Thanks for sharing this great tutorial. My kids use this type of clay all the time. The next time they sit dwn to make a project, I am going to have to join in the fun and make some flowers!
Great tutorial. I love the flowers. I love your blog. Told my daughter about it, she has to check it out. thank you for sharing your wonderful ideas.
What a wonderful craft tutorial and a giveaway too! I am so excited. I enjoyed my visit to your blog. It's just lovely. I look forward to your posts ( I'm following). Wishing you happiness, Katherine
Hi Carol. they are beautiful, I love roses and you make some beautiful, I never useclay for making flowers,
I always have Ceramic, Italian and Porcelain dough ..
http://craftaworld.blogspot.com/
I am always looking for polymer clay projects to do with my niece's..most times we make refrigerator magnets, usually w/ a holiday theme. These would be great for that, just glue them to a magnet. Thanks for posting
Oh yummy Carol! I just love all your tutorials!
it's so funny because whenever i have done play-doh with my boys, they make monsters and i make roses. i never ever thought to use something like this. how fun! your roses are beautiful.
i am sooooo going to michaels tomorrow!
thank you for the great tutorial.
xo
your newest follower ...
I just found your blog and your clay roses tutorial. Your roses are absolutely gorgeous!!! Thanks so much for sharing.
What a pleasure to run into such beauty on this
my first day of blogging. Thanks for sharing your
talent with us.
Hi...I have only just discovered your blog...and its amazing! Thankyou so much for showing how to make clay roses....I have envied people for making these and now I am going to try it myself. Its always exciting to learn new crafts. Thankyou.
Hi Carol, thank you so much for stopping by tonight. I bought the Fimo clay and am going to try to make the roses. I had no idea you could paint the clay after baking. I also never thought of cutting the little bottoms off. I am so glad I came by. You are always so generous and very helpful. I will let you know how I do at this, Char
The pictures are very nice and so cute.well prepared.This is the nice post.Well published here.good thinking to post here.well shared here.thanks for sharing here withus.
Post a Comment