September 27, 2012

Adding Bling To Anything

It seems that when I add a little bling to anything, it sells...


I've had my antique booth for 9 years and have cultivated a lot of "regulars", or repeat customers. I love my regulars; they are the heart of my business and these folks LOVE bling

I spray my boring treasures with heirloom white paint, pick a little bling, and attach it with E-6000 glue


My boring treasure just got a lot less boring 


Yep...a little paint and a little bling 


Sometimes the touch of bling comes in the form of chandelier crystals

This candle sconce started pretty ho hum


But, with paint and vintage crystals...


...that "ho hum" didn't last.  These are especially good sellers around the holidays when people are in a really blingy mood


You might be interested in these previous posts

"Where I buy chandelier crystals" is HERE

"How to add chandelier crystals to anything" part one is HERE and part two is HERE


I priced these between $8-$18 and the candle opera at $22

Yep, I love to get my bling on...and my customers love it when I do!

Happy Creating!

Carol

September 24, 2012

Wedding Boutonnieres

I am so excited to have my son visiting from DC this week! He and the future DIL are getting their wedding license, marriage bands, and going for their food tastings. 
  

While he's here I got his stamp of approval on the boutonnieres for his vintage themed November wedding.  I think it is so crazy that fresh flowers are no longer mandatory....Yipppeee for me, "Miss Crafter!"


I got the idea from Somerset Life Magazine, it was an article on making boutonnieres for prom


Here are the supplies I used:


The leaves were made by forming copper wire in a leaf shape.  The wire was hot glued to a vintage book page that was further aged with walnut ink.  Then I simply cut around the outside of the wire to make the leaf...


...I used burlap for the back...


...and hot glued it all together, finishing it by tying twine around the stem


I didn't know until my son was engaged that vintage and DIY weddings were in vogue.  It's all over wedding magazines, Etsy, and Pinterest and I am beyond thrilled that my son and future DIL have embraced the theme. 

The boutonnieres were fun and easy to make and the best part......My son loved it!

Happy Creating!
Carol

September 20, 2012

Shabby Rocking Horse Transformation

 It's so fun to transform something besides the usual furniture, this time it was a vintage rocking horse


The owner of Orange Tree Antiques gave me this poor little pony, she thought maybe I could do something with it....Giddy up...


....Oh yes I could, I painted it with homemade chalk paint in heirloom white...She already feels better....Oh yes, she's a girl pony for sure! 


 Then I sanded her a little and used Annie Sloan dark wax to age her and applied water slide decals of roses on her legs.  

How to make water slide decals can be found HERE.  

I have had a lot of requests to make flower water slide decals to sell and I promise you, it is on my list to do after my son's November wedding.


The horse's mane was upholstery fringe I already had and the pearl eyes were from vintage earrings


And there you have it......Meet...."Abby Rose"


OH, I don't think it's ever a good idea to name your projects.....


....If I had a girl this would be staying right here.   Can't you see this in a little girls room or a nursery?


"Abby Rose" galloped over to my booth at Orange Tree Antiques where I priced her at $45.00

I love doing transformations, but I have to tell you....Some are a lot more fun than others!

Happy Creating!
Carol

September 17, 2012

How To Do A Raised Stencil With Vinyl Spackling

Stenciling with vinyl spackling is an easy way to add a little interest to a piece of furniture 


I loved these old farm chairs


But, wanted to add a little something to jazz them up

Now, using a stencil for a raised design is nothing new to the DIY world, it can be done with any form of putty or plaster.  

The tip I want to share with you is using VINYL SPACKLING to stencil, it can be found at any hardware or box store, I got mine at Ace hardware


I find it gives a cleaner, crisper, raised stencil, than using plaster or putty

Tape your stencil down....


....Then put a thick coat of vinyl spackling over the stencil 


And lift the stencil off

You get a perfect stenciled design every time....No fail!


I finished the chairs with homemade chalk paint, a little sanding, and Annie Sloan dark wax

And the stenciled design jumps off the chair


I decided to use drop cloth fabric to cover the seats since I didn't want to draw attention to the obvious fact that these old farm chairs were missing their cane seats


This technique works great on all sorts of projects that need just a little pick me up, wooden boxes, dresser drawers...Oh, you guys will think of tons of uses!


I priced these chairs at $38.00 each and put them in my booth at Orange Tree Antiques

So there you go kids, my tip for the day...... Use vinyl spackling for no fail raised stenciling

Happy Creating!
Carol

Partying with 
Debbiedoo's
Savvy Southern Style

September 13, 2012

Estate Sale Finds

I had the best time shopping at an estate sale this last weekend, this home was jam packed with all the things I LOVE.


I went late in the afternoon and all of these goodies were left, I'm always amazed that shoppers leave all of the goodies I love!

Look at these needle point pillows (They can be sold as is, or taken apart and framed, or used as a chair seat cover), 3 gorgeous vintage hat boxes, and a full roll of vintage rose drawer liner...OH MY!


3 yard pieces of vintage fabric..... Me loves fabric!


Tons of linen and vintage kid leather gloves in their original packages


Be still my heart..... Vintage wrapping paper, cake decorating umbrellas, hats, and gorgeous vintage playing cards


A bisque wall pocket, needle point picture and purse, and 3 vintage pink hangers with clear plastic covers 


Some of these goodies will go in my booth at Orange Tree Antiques and some will be staying right here with me!

If I haven't told you lately, THANK YOU for taking the time to drop by!

 Happy Creating and Shopping!
Carol

September 10, 2012

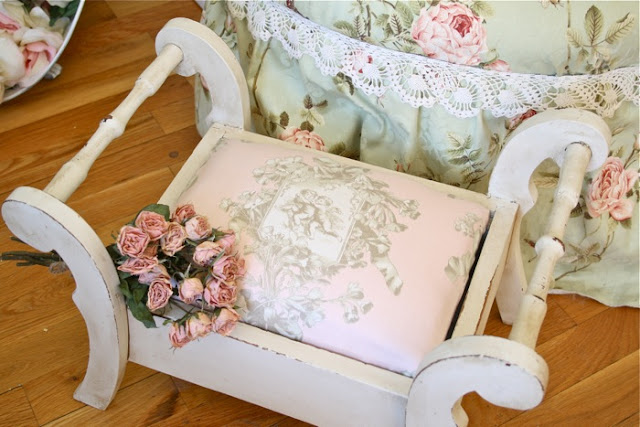
Repairing An Antique Stool With Epoxy Putty

 I fell in love with this cute little antique foot stool at the thrift store, but it had a problem!


This is what the poor little thing looked like when I found it


And this is why everyone else passed it up...Bad Dog?!


No problem!  After I did some heavy duty sanding of the wood, I used epoxy putty and molded it as close as I could to the original shape of the handle.  


After it dried I sanded it again to get it nice and smooth...Can you find the repair?  Maybe, but it looks pretty good.


I then painted it with heirloom white paint that I made into chalk paint.  It's been so hot here in Florida that I have been painting inside with homemade chalk paint, adding plaster and water to regular paint, no real recipe, but you can find a ton of them on the internet.  

I finally caved and got some Annie Sloan dark wax...I love it!  It gave an authentic aged look to this little stool 


I covered it with pretty toile fabric and lined the inside with wallpaper 


Then I finished the backside of the lid by copying onto Fabric (Tutorial HERE) a furniture ad from Graphics Fairy.   I glued the printed fabric with Fabri -Tac and trimmed it out with braid 


Oh, this little stool is feeling much better now!


Epoxy putty is a great tool to have in your DIY arsenal.  I have used it to repair wrought iron, fix broken corners on tables, and to fill in missing gesso on ornate frames (Tutorial HERE)


I am going to price this cutie at $38 and put it in my booth at Orange Tree Antiques

 Thank You to everyone that entered the Goose Creek Candle giveaway, the winner is Gina @ Random Thoughts Of An Incoherent Mind

Congratulations and Happy Creating!