
Making Clay Roses


Make it-Follow the tutorial
Win it- Leave a comment and follow my blog
Usually with a new craft there is a considerable investment in supplies. The great thing about making clay roses is that your investment is a toothpick and $1.29 block of clay.


.

Now, there are many kinds of clay, these little packs are $1.29 and a great way to start if you aren't sure if this is your craft. Be sure to get clay that you bake to harden.

I prefer the Sculpey, but there is no wrong choice. Sculpy comes in a big block for around $7.00.
A note about color. I get white and then paint it, I just don't dig any of the colors it comes in. Here is the pink and green pre-colored clay.

Are you ready? Here we go!
There are many ways to make clay roses, this is how I make them.
Take your clay and work it in your hands to get it softened up. Now roll it into 5-6 little balls.

Take your little balls and flatten them into circles or closer to ovals.

You start by rolling the center bud, I make this one a little fatter then the rest.

Then keep adding your petals, alternate them so they don't all start and stop at the same place.


As your layering the petals, make the outside edge of the petal thinner so the final layer is really thin just as it would be on a real rose when it is ready to drop off.


Note how the petals are curled.

You can add as many petals as you like, 5-7 for a good size rose and 3-4 for a bud. In the following picture you will see the rose in the front is more like a cabbage rose, I curled the petals a little more and pinched the petals here and there. The roses in the back are more "Perfect" (I use that term loosely). I like both styles.

When you have added all of your petals you can pinch off the bottom or cut it so it's flat.

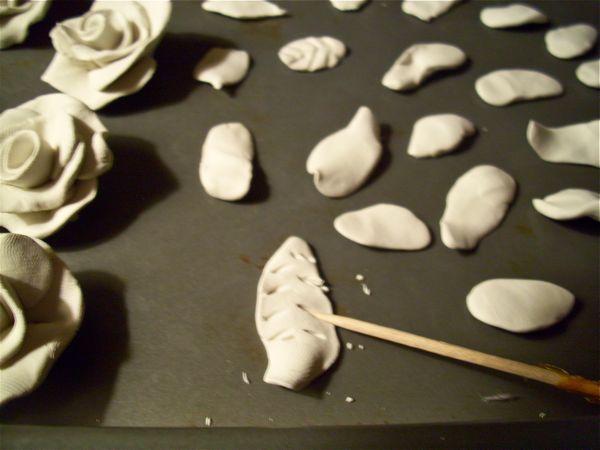
Next make the leaf shape and then use a toothpick to put the lines in. Be sure to curve some of the leaves before you bake them so that they are not all flat.
It's time to bake. Each brand has a little different directions for baking. I have found 270 degrees for 25-30 minutes works for me. If you do not bake them long enough they will have a rubbery texture instead of being rock solid.

Let them cool, then it is time to paint.

You could brush on acrylic craft paint, but I like to use spray paint as it is easier to get in all of the crevasses.

Spray the backs and then the front. I use a brush to paint the leaves because I have not been able to find a spray paint in green that I like.

Ta Da!

A Platter of Roses
Platter available at my on line store The Polka Dot Closet
Now what are you going to do with your roses?
Add them to a picture frame?

How about a knob?

Here is a chance for my Bloggy Friends to
Win it!

5 roses, one with a vintage jewel in the center (Just leave out the center bud and then insert the jewel after you paint) 5 leaves, and a 5 ft strip of imagine fabric.
Imagine what you could do with these roses.
To Enter the Drawing on 5/29/10
The winner is Bird from BirdCraft
Become a new follower and leave a comment.
or
If you already follow, leave a comment and say "I already am"
Limited to the continental US and Canada
That's it kids.....Get Creating!!
Carol

